Technology for the ADHD Real Es…SQUIRREL!!!
Real Estate Agent & Trainer using the power of technology to achieve maximum productivity
Publishing a Google Calendar
Posted by on 15 June 2012
Ok, so I got out the cart, now let me go back and get the horse. Once you have a Google account set up for the office and your Google Calendar is ready to publish on your MC’s website, follow these steps:
Log into your Google account and click Calendar. On the top right click the gear for the Settings menu, then click Settings. Click the second tab, Calendars.
(Note: these pictures have been cropped to remove trapped white space)
(Figure 1)
I recommend that first you click Shared: Edit Settings first, unless you already have your calendar set to be public. If you have it public already, click the name of the calendar.
(Figure 2)
Now check the box to Make this calendar public then click Save. This will take you back to the previous screen. Click the name of the calendar to go to the next step.
(Figure 3)
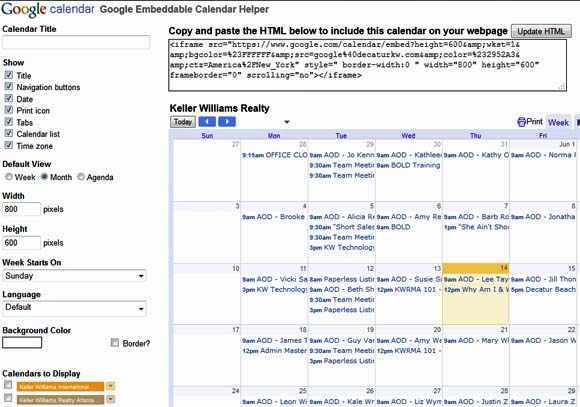
 At this point, you can choose to use the default code, or you can customize it if you wish by clicking the Customize option (see the star). The only thing to be sure is a particular setting is to ensure that “width” is set to 800. If you choose to customize how the calendar will look, when you click the link by the star above, you’ll be taken to this screen to set your options:
(Figure 4)
After you set the calendar title, select which items to show, the default view, background color, etc., be sure to click Update HTML (top right of the screen).
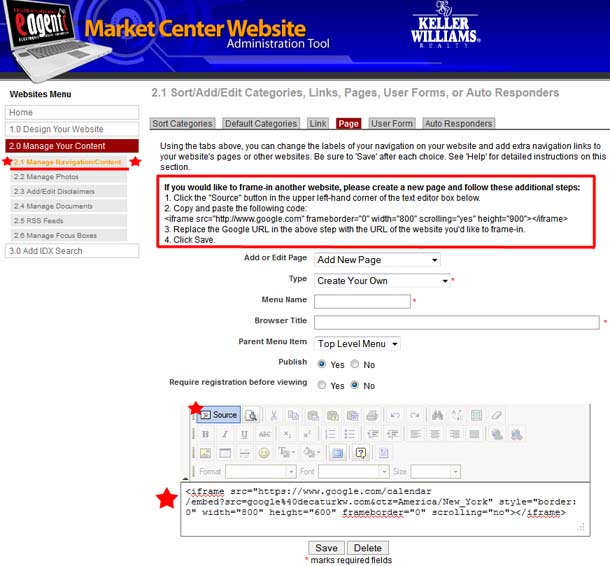
Now log in to myKW (MC Tech Coordinator role is required), access the MC Website Admin tool (under Technology, click the second item, MC Websites, then click MC Web Site Admin). Navigate to section 2.1, Manage Navigation/Content. Choose to Add New Page of Create Your Own type, set the Menu Name to the name you want shown as the link on your home page, and enter the title you want shown on the browser tab in the Browser Title box. Decide whether to make it on the Top Level or under another parent item and be sure Yes is chosen to Publish the page once you are ready.
(Figure 5)
In the red box of Figure 5, above, are the instructions on how to embed a page into your website. For any basic kind of page, click the Source (★) button, then copy the code as instructed in step 2 and paste it into the Text Editor box (★). Replace the http://www.google.com from that code with the link to the page you want shown. When embedding the Google Calendar, simply click the Source button and paste the code from either Figure 3 (if not customized) or Figure 4 (if customized) above. Click Save and your calendar is now live!


