Technology for the ADHD Real Es…SQUIRREL!!!
Real Estate Agent & Trainer using the power of technology to achieve maximum productivity
Category Archives: Marketing
[Review] Batch Picture Protector
Posted by on 13 June 2013
Editor’s Note: This original posting was way too long & a review and a how-to in one. This is simply a review, and the original has been edited into the “how-to” part.
Fortunately, the stealing of house pictures from our listings for use in online classified *cough*Craigslist*cough* scams has decreased significantly over the past year or so.
For those unfamiliar with the scam, criminals would download listing photos from any syndication partner & use them in an ad to rent the home. When their prey would email about the ad, they would reply that they were in Buffalo (or Santa Fe, or Minot) with a family emergency. If, however, the tenant was really interested in renting the home, they could simply send a money order for the deposit & 1st month’s rent to PO Box …. and the ‘owners’ would mail the keys, garage door openers, etc. That way they could move in without having to wait for the ‘owners’ to get back in town. You would be AMAZED how many people fell for this. My personal favorites were people who agreed to pay $2000/month for a 1-bedroom and then sent their money order to an address in Nigeria.
Even within our own ranks, we have listings that expire or are withdrawn for one reason or another and are eventually re-listed. Sometimes the new agent downloads YOUR photos for their own use. (Ironic, isn’t it, that a seller would choose a different agent because they believe she will work harder than you did, and from the beginning of the relationship she’s taking the lazy way out…I digress.)
In order to stop this, and to further one’s brand, many agents have taken to super-imposing their phone number, email, etc. on listing photos. This typically requires using a program like Adobe Photoshop (or so most people think) and it’s quite time-consuming. Open a photo, position the text/image perfectly, save the file, lather, rinse, repeat…

Today I stumbled on a really neat program called “Batch Picture Protector” from the folks over at SoftOrbits. The software interface is incredibly simple. In all honesty, it’s a little too simplistic for me – probably because I’m a nerd. It’s not 100% intuitive, either. For example, it took me a little bit to figure out that you have to add your photograph(s) before you can do anything with watermarks.
Adding the file(s) to be watermarked is done the same as in most any program: Click “Add File” or “Add Folder.” Yes, this will do an entire folder in one quick session- hence the name “Batch Picture Protector.”
The user has the option to watermark the photo with either text or an image (or both). For Text, this box appears when you click “+ Text Watermark”

As you can see, there are quite a few options:
- Name a watermark & save it if you plan to use it again
- Select from frequently-used watermarks (where “%filename%” appears), such as “Demo,” “Example,” “Copyright,” etc.
- Select where the watermark will appear on your photos (“Position” – and the offsets if you REALLY want to be OCD)
- Choose the font, size, alignment, color, etc. of the text
- Set the transparency in single-digit increments from 1-100
- Set the text to be on an angle if desired
- Add a background color (think highlighting) of your choice, set the transparency of it, and add a “shadow” or “glow.”
The options above results in this:

Adding a “Logo Image” (publisher’s term for ‘watermark image’) has this screen:
![]()
As I mentioned earlier, you can do both a Text Watermark and a Logo Image, or even multiple text or logo watermarks. Simply add/load all of the watermarks you plan to use for the day, and check/uncheck the box on the right to enable/disable a particular watermark for your current batch.
Setting the transparency of your image is easy, and you can play with it until you get it just right. Here is a transparency of 100% versus a transparency of 50%


Because watermarks vary in type & shape, the flexibility of placement is absolutely essential. With the middle placement selected in the text example above, you’ll notice the text appears in the center of the screen. For my image, though, I chose the middle bottom.
The program allows for an image to be either a percentage of the watermark’s size or a percentage of the source image’s size. Not sure why you would want to keep the watermark the exact same size, because your photos will be different sizes. Here is an illustration of the watermark size being constant across varying sizes of photos:


Once you have your image in place, you simply click “Batch Watermark,” choose your destination folder, click Start, and you’re done I did an entire folder of photos (in the same time it would take to do a single one), and I’ve selected 7 of the results to show what it looks like at 100% of Source Image size and 75% transparency. Notice how the watermark appears over different colors in the background.

Overall, I’d give this program a strong B+, maybe even an A-.
Using Batch Picture Protector
Posted by on 12 June 2013
Editor’s Note: This original posting was way too long & not just a review but a how-to. I’m going to change it to a how-to and make today’s (Thursday’s) into a review.
Today I stumbled on a really neat program called “Batch Picture Protector” from the folks over at SoftOrbits and wanted to introduce you to some of its features & ‘quirks.’ I already had a watermark image in mind, so I quickly threw it together in my photo editing software.
The software interface is incredibly simple. In all honesty, it’s a little too simplistic for me, because I’m a geek. My OCD & geek crashed into each other when I saw that the tools you use are in the “Toolbos,” (sic), in addition to Zoom In & Out, there’s apparently now a “Zoom Normal,” which is an oxymoron IMNSHO. The OCD/geek also growled when I saw that the vast choices I expected to find when I clicked “Options” were was just one: language selection.
Important note before we go further: Adding a watermark with this program does NOT impact your source photo in any way. You select a destination folder for your watermarked images, and the program creates a copy of the photo.
The GUI is not 100% intuitive, either. Some things I learned after a bit of struggle (and by ‘struggle’ I mean ‘reading the manual’):
- You have to add your photograph(s) before you can do anything with watermarks. Everything related to watermarks is greyed out until you load your photos.
- To upload / add your watermark image, you click the “+ Logo Image” button and “Browse” on the next screen.
- I was very excited to see that you could one-touch publish your photos to Facebook, Twitter, and YouTube with the buttons at the bottom — until I realized they’re actually just links to the publisher’s page on those sites.
- “Batch Mode” is just your destination folder selection and a “Start” button. It’s not a “mode” and you will also use it when you’re only doing a single photo, so it’s not limited to “batches.”
- Despite having an underlined letter, the toolbar cannot be accessed with an “ALT +” shortcut.
- When you disturb the “Toolbos” – by clicking the X or by going to “Batch Mode” – you have to click “Watermarks” to get it back.
- Because it has the feature to add multiple text or image marks, which is a nice plus, you don’t edit a watermark by clicking on “+ Text Watermark” or “+ Logo Image.” Granted, I should have realized that “+,” means to “add,” not to edit. To edit the options on what is already loaded, double click the name of it in the “Watermarks” box.
So, to start from the beginning, add the file(s) you want to watermark by the buttons on the toolbar. You can also choose to add a single photo, multiple photos, or even an entire folder – hence the name “Batch Picture Protector.”

To add a text watermark, click “+ Text Watermark” and you’ll get this dialog box:
The box above results in this:
–OR–
To add an image, click “+ Logo Image,” to get this:
![]()
Click “Browse” and select the image you want to use as a watermark.
As you can see in the two boxes, there are quite a few options.
- The Magenta star shows you can name this watermark & save it if you plan to use it again.
- The Green star shows where you can set the text to be on an angle, if you desire.
- The Yellow star shows where you can add a background color (think highlighting), choose the color, set the transparency, and add a “shadow” or “glow.” This is especially helpful if your source photo has a large array of colors and some of your letters get lost in a similar color.
Two of the most important items, however, are:
- The square, which indicates watermark placement. You can choose between 9 places, depending on the type & shape of your watermark. Because I have the middle box selected in the TEXT example above, you’ll notice that the text appears in the center of the screen. When I choose the middle-bottom box in the LOGO example above, my watermark became centered on the bottom.
- The oval, which shows how to set the transparency of your image. You may want to play with this a bit to see what works best for you. Here is a transparency of 100% versus a transparency of 50% (and yes, the setting is in increments of 1, not 50):
A third “most important item” is:
Just as you can set the size of the font, you can determine what size you want the logo to be. You have two options:
1. Set it to appear based on a percentage of the watermark’s original size. This can be problematic unless all of your photos (in this batch) are the exact same size. Here is an illustration of what may happen if you have it based on the watermark and your photos vary in size:
2. Set it to a percentage of the source image. This is my recommendation. Setting it to 20% and putting it in one of the corners may be best for a simple copyright or security watermark. Due to how I designed my watermark, setting it to 100% of the source image was best. See the transparency example above or the collection at the end for examples.
With Batch Picture Protector, you can even do a Text Watermark AND a Logo Image. This comes in handy if you’re doing multiple batches, each requiring different settings, as adding (or loading) all of the watermarks you plan to use may save time if done all at once. Just because a watermark is listed in the box doesn’t mean it will appear on the photos. Check or uncheck the box on the right to enable/disable a watermark for the batch you’re currently running.
Take it to the next level and add multiple text or logo watermarks. Because the watermarks are independent of each other, you can put the full logo at the bottom, a copyright symbol in the top left, “FOR LEASE” written diagonally across the photo in white and another text box in the center of the top showing the file name. I’m not going to take it THAT far, however adding both text & logo to a photo would result in something like this:

As you’ll notice in each of the screenshots above, all of your selected photos are shown down the left side of your screen. (TIP: If this box disappears, simply click “View” > “Source Images.”) The beauty of Batch Picture Protector is that you can get a preview of what each individual photo will look like with your watermark settings by simply clicking on the source photo. When you tell the program to start adding the watermark, EVERY photo in this line will be done in a matter of seconds. If you determine in previewing that you don’t like how the watermark appears on an individual picture, or you’ve added a folder with some photos which should not be watermarked, remove them from the list. Removing individual photos means selecting them and going to “File” > “Remove Selected.” When you’re finished with a batch, you can select “File” > “Remove All.”
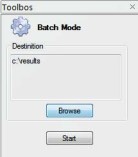 Once you have your image in place, click “Batch Watermark” (under the buttons to add a text or logo), and you’re presented with the dialog box to the right. Set the desired destination folder by browsing, click “Start,” and it will be finished in seconds. I did an entire folder of various-sized photos in roughly the same time it would take to do a single one.
I’ve selected 7 of the results to show what a watermark will look like at 100% of ‘Source Image’ and 75% transparency. Notice how the watermark appears when over a darker area compared to a lighter area.
Here are the results:
Harnessing Pinterest for your business
Posted by on 05 March 2012
If you’re like me, you’re hearing Pinterest everywhere you turn. I decided to explore it from various perspectives and posted a deconstruction of the site yesterday. I hope it helped you see beyond the hype & scary stories of copyright infringement.
Of course, I’m not in the business of social media, I’m in the business of real estate which, at its core, is about lead generation. So the question for me is how to harness the power of Pinterest as a marketing tool? Well, to catch a squirrel-chaser, you’ve got to think like a squirrel-chaser (Your reading this indicates that you probably already have a firm grasp of that particular skill.) So let’s take a moment to think about what shiny objects grab your attention the fastest and hold it the longest. Take 30 seconds to list a few – I’ll wait here to make sure you don’t get distracted & leave… Ok, welcome back. As I wrote yesterday, Pinterest is the intersection of many sites you’re probably already using, so now I want you to think about the advice you’ve gotten about using those individual sites.
- That session at the tech camp told you to do _____ on Facebook.
- Your notes from the mastermind you attended say you should use Twitter as ______.
- The webinar on blogging said the way to get your blog seen is to _____.
- The leads you got through social media came when you ______.
While you’re working on filling in the blanks with what you know works, let me share with you some of the ideas I’ve come up with for turning this squirrel into a squirrel trap:
- Bloggers have long been writing reviews of local businesses. How about taking a picture of the restaurant owner in front of her business & using the 500-character comment section to let people get to know her & how she approaches food. Take a photo of some of the regulars at the local watering hole on a Friday night and ask them why they love the place. Be sure to link each quote to the person’s Pinterest page when you do. Do the same with communities or condo complexes.
- Familiar with geocaching? Instead of using GPS coordinates, take photos of more obscure areas around town (the big oak at the dog park, the cashier stand of a favorite boutique, or a recently-renovated subway station) and post them with a date & time. The first 5 or 10 people to find you & say your business tagline get a prize. Then take a photo of you with the winners & tag their page. If it’s the boutique, get them to sell you gift cards for half-price in exchange for the marketing. Be sure to stay even after you’re out of prizes to establish or strengthen relationships.
- Be positive! Catch people doing something right and post their pic with a blurb about their good deed – especially government employees or dedicated volunteers.
- Photos of your clients in front of their new house – with a testimonial.
- Pics of the latest must-have gadgets, or tips for improving / decorating / staging a home. Make the board open for others to contribute their ideas, too.
- Photos from your client appreciation party, sharing what the person means to you.
- Don’t just LIST your vendors, take pictures of them, their business, or their work.
- Put your vision board out there for everyone to see and help you achieve.
- Have people submit their baby’s photo or a funny pet pic, then set up a poll on your business’s Facebook page so people can vote for their favorite. The winner gets _____.
Ok, so now that you’ve had time to think, what ideas have you come up with?
How NOT to get lost chasing the Pinterest squirrel
Posted by on 04 March 2012
It’s been called the king of social media “squirrels” – the ubiquitous description for anything that distracts from the important and spirals you into uselessness. Here’s a radical concept: exercise some self-control. Make your site a squirrel for others to chase. If you can manage that, you might just nab some squirrel-chasers (a.k.a. “clients”).
First of all, what IS “Pinterest?” They self-describe as a “visual pinboard,” which is horrible marketing, IMHO. I mean, have you ever installed an audio or olfactory-based pinboard on your wall? So let me draw a “visual picture” for you. Pinterest is the intersection (and sometimes train-wreck) of:
- The “Interests / Activities” lists of Facebook
- The “Like” and commenting functions of Facebook photos
- The hashtags & “@username” mentioning function of Twitter
- The photo hosting of Flickr
- The ‘Categories’ filing system of your blog
- The user-defined community (local and hyper-local) information of Wikipedia
- The link-bait capabilities of all the best sites
And thus I present to you “Lessons Learned While Watching Social Media Squirrels”
The “Interests / Activities” lists of Facebook helped me identify common interests with a potential client before I presented my agency offer. They got out of control, however, when we began claiming every activity we had heard of as being something we actually were into. Lesson: Curb your enthusiasm, and your time online, by going deeper with your interests rather than trying to be everything to everybody.
The “Like” and commenting functions of Facebook allowed us to interact with our sphere rather than just continually pushing out content. The same applies for the “@username” tagging function of Twitter. Lesson: Train yourself now to make interaction a vital part of your time on Pinterest.
The hashtags from Twitter and the ‘Categories’ & tag functions of your blog allow us to easily follow common threads. They also increase reader retention because one can go link-to-link on the topic of interest. Lesson: As Gary Keller would say, “start with the end in mind.” Create broader categories and fill them with interesting content.
The hosting of photos on Flickr and videos on YouTube allows us to get our content out to the world. Pinterest takes this to a whole new level, with great advantages of hosting content here. Lesson: Because our brains actually think in pictures, not words, Pinterest has built a better mousetrap – or squirrel trap – for capturing leads and interest.
If you haven’t heard the phrase “hyper-local,” welcome back from hibernation. With Wikipedia, you had a chance to describe your area in glowing terms. Then others had the right to edit your words and make sure you remained relatively anonymous. With Pinterest, it’s your baby and you get to dress it as funky as you want. Lesson: Here’s your chance to show me why I should move to your area. Prove to me that you’re the local expert by introducing me to the people that make your town great and giving me detailed information on the places and events around you.
Techies have been saying for years that you should master baiting best-practices. Pinterest is growing at an astronomical rate, and THIS is the time to go scribble your web address all over the canvas. Lesson: Post photos that relate to a community or story on your website or blog, then make it a hyperlink to that community or story.
…More to come…
Getting your KW Profile Score to 100%
Posted by on 01 March 2012
I get asked about profile completeness at least twice a week, so I decided to post the score factors here. TIP: The easiest way to get to these is to click “Profile,” then the Edit located under “Other / My Referrals.” Your “Referral” profile actually brings up both your referral information AND your White Pages entry on the same screen, saving you from going through the “My KW Info / White Pages” and the “Other / My Referrals” sections separately.
Here are the items in your profile and the percentage points each carries:
| Weight | Field Name | Notes |
|---|---|---|
|
Referral section
|
||
| 0% | Team Name | |
| 5% | Specialties | Include all possible ways of searching (i.e. ‘e-Pro’ & ‘ePro,’ or ‘LGBT’ & ‘GLBT’ – and even ‘gay and lesbian’ for good measure.) |
| 1% | Designations | Remember: REALTOR *is* a Designation. |
| 1% | Slogan | |
| 5% | Service Areas | Name as many areas as you possibly can. |
| 1% | Languages | Yes, Virginia, English and Spanish do count. |
| 3% | Referral Notes | Are you willing to take referrals? Pay competitive referral fees? |
| 0% | Loss Mitigation Resume | |
|
White Pages section
|
||
| 10% | Image | And PLEASE don’t be pretending to talk on the phone… |
| 5% | First Name | First letter capitalized, the remainder in lower case… |
| 5% | Last Name | First letter capitalized, the remainder in lower case… |
| 5% | Street 1 | Abbreviations accepted, periods not required (i.e. – 100 W Main St) |
| 0% | Street 2 | |
| 5% | City | |
| 5% | State/Prov | |
| 5% | Zip/Postal | |
| 5% | Business Phone | |
| 0% | Home Phone | |
| 5% | Mobile Phone | |
| 5% | Text/Carrier | |
| 0% | Fax | |
| 2% | Country | We ARE an INTERNATIONAL company now!!! |
| 0% | Gender | |
| 0% | Salutation | |
| 5% | Biography | |
| 0% | Display URL | |
| 3% | Facebook URL | Preferably for your BUSINESS Page, and ONLY the last segment – and no ‘facebook.com/…’ |
| 1% | Twitter URL | ONLY your username – no ‘@’ or ‘twitter.com…’ |
| 3% | Blog URL | Unlike the previous two, the full URL. |
| 5% | Display for customers | Should your profile be available for customers to find you, or would you prefer to be a “Secret Agent?” |
| 10% |
Add FMLS to your eEdge website (metro Atlanta agents)
Posted by on 06 December 2011
Great news! You are no longer restricted to Georgia MLS (GaMLS) being your only IDX for eEdge. Now you can add the feed from FMLS!
Now for the not-so-great news. When you added GaMLS, all you had to do was select it from the MLS list and add your username. Adding FMLS is a bit more involved, so the instructions below may seem klunky and disorganized. What you see in GREEN will be actions you take on the FMLS site. You’ll be doing everything you read in RED on the myKW / eEdge site.
Step #1. Log into MyKW and go to the eEdge Dashboard (by clicking New Lead or by clicking Show Options under myMarketing, then clicking Manage eEdge Website – which is supposed to be the ‘easy’ way). Navigate to the Profile Info tab under Website Admin. Write down the URL which appears beside “Website.” (Figure 1)
Step #2. Log into FMLS. In the left navigation, hover My FMLS and click Edit My Roster. Be sure the website shown under Website URL is the same noted in Step #1. If it isn’t and you need to change it, the servers may take several hours for the corrected info to change across the board. (Figure 2)
Step #3. If your roster entry had the same Website URL as your eEdge profile, go to Step #4. If not, check back every few hours until you see that the info in your FMLS Roster matches the info in your eEdge profile.
Step #4. When (and only when) your FMLS Roster Entry, go back to the FMLS homepage, hover Tools for Success, and choose FMLSweb at the top of the far right column. Click “FMLSWeb Agent Elections,” and be sure the radio button beside I elect to use an ‘FMLSweb Approved Data Vendor’ is selected, then click Submit Elections. If you agree to the T&C’s, click I accept the… and you will be taken to a list of Approved Data Vendors. Scroll down until you see “Market Leader,” click the radio button beside it, and then click Choose Election. You will be CC’d on an email from FMLS to Market Leader indicating your election to provide Market Leader with the FMLS IDX feed. (Figure 3)

Step #5. It may take 1-2 business days before Market Leader activates your FMLS feed. In the meantime, go to the MLS Administration tab of your eEdge website and click Start MLS Application. Select ‘First MLS’ from the drop-down list and click Save. (Figure 4)
Step #6. When Market Leader provisions your IDX feed, the status beside First MLS in your MLS Administration tab will change to ‘Approved.’ Once this status is updated, navigate back to your Profile Info tab. At the bottom of the page, click Edit. Now click Add Agent MLS ID. From the drop down box, select the new option of ‘First MLS’ and enter your FMLS username in the Agent MLS ID field. Click Save in this box and again at the bottom of the page. (Figure 5)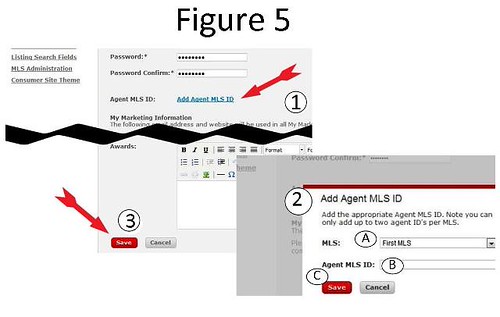
Congratulations! Within a few minutes, you should see listings from both services displayed on your eEdge website.
(Note: If you didn’t already have Georgia MLS provisioned, repeat Step #5, adding Georgia Area MLS this time. Since GaMLS is pre-authorized, you can immediately proceed to adding your Agent MLS ID as shown in Step #6.)
Posting ads on Craigslist
Posted by on 28 September 2011
I recently saw a question on a real estate website from a consumer who wanted to list her out-of-state property for sale (by owner) and was asking if it was safe to list the home for sale on Craigslist. I decided that the answer was one that could benefit more than just her, so I wanted to share it with you here.
One of the biggest scams going on right now is people stealing the pictures & addresses of homesPosting ads on Craigslist for sale and then posting a fake “For Rent” post with that info. They’ll usually seem very legitimate to the consumer at first, and then they ask for the first month’s rent and deposit to be mailed to a PO Box somewhere different – often out of state. One way to combat this is to add your phone number or email address to the picture by overlaying it in a way that the scammer couldn’t easily remove it. This can be done with very little skill required if you can use a program like PowerPoint. Simply insert the image to a blank slide and add a text box where you’ll put your information. Place the text so that it doesn’t obstruct the view of the home, and is still in a position that removing it would render the photo useless. I’m attaching a photo of some options I recommend (using stock photos).

Embed the text using PowerPoint
